Progressive Growing of GANs for Improved Quality, Stability, and Variation
— Official TensorFlow implementation of the ICLR 2018 paper
Tero Karras (NVIDIA), Timo Aila (NVIDIA), Samuli Laine (NVIDIA), Jaakko Lehtinen (NVIDIA and Aalto University)
- For business inquiries, please contact [email protected]
- For press and other inquiries, please contact Hector Marinez at [email protected]
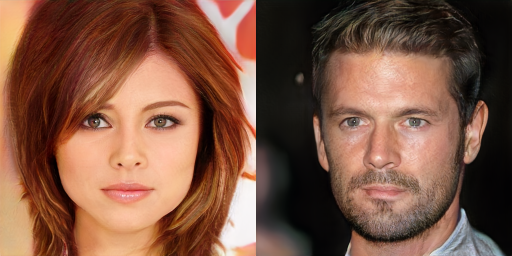
Picture: Two imaginary celebrities that were dreamed up by a random number generator.
Abstract:
We describe a new training methodology for generative adversarial networks. The key idea is to grow both the generator and discriminator progressively: starting from a low resolution, we add new layers that model increasingly fine details as training progresses. This both speeds the training up and greatly stabilizes it, allowing us to produce images of unprecedented quality, e.g., CelebA images at 10242. We also propose a simple way to increase the variation in generated images, and achieve a record inception score of 8.80 in unsupervised CIFAR10. Additionally, we describe several implementation details that are important for discouraging unhealthy competition between the generator and discriminator. Finally, we suggest a new metric for evaluating GAN results, both in terms of image quality and variation. As an additional contribution, we construct a higher-quality version of the CelebA dataset.
★★★ NEW: StyleGAN2-ADA-PyTorch is now available; see the full list of versions here ★★★
Resources
- Paper (NVIDIA research)
- Paper (arXiv)
- Result video (YouTube)
- Additional material (Google Drive)
- ICLR 2018 poster (
karras2018iclr-poster.pdf) - ICLR 2018 slides (
karras2018iclr-slides.pptx) - Representative images (
images/representative-images) - High-quality video clips (
videos/high-quality-video-clips) - Huge collection of non-curated images for each dataset (
images/100k-generated-images) - Extensive video of random interpolations for each dataset (
videos/one-hour-of-random-interpolations) - Pre-trained networks (
networks/tensorflow-version) - Minimal example script for importing the pre-trained networks (
networks/tensorflow-version/example_import_script) - Data files needed to reconstruct the CelebA-HQ dataset (
datasets/celeba-hq-deltas) - Example training logs and progress snapshots (
networks/tensorflow-version/example_training_runs)
- ICLR 2018 poster (
All the material, including source code, is made freely available for non-commercial use under the Creative Commons CC BY-NC 4.0 license. Feel free to use any of the material in your own work, as long as you give us appropriate credit by mentioning the title and author list of our paper.
Versions
There are two different versions of the source code. The TensorFlow version is newer and more polished, and we generally recommend it as a starting point if you are looking to experiment with our technique, build upon it, or apply it to novel datasets. The original Theano version, on the other hand, is what we used to produce all the results shown in our paper. We recommend using it if — and only if — you are looking to reproduce our exact results for benchmark datasets like CIFAR-10, MNIST-RGB, and CelebA.
The main differences are summarized in the following table:
| Feature | TensorFlow version | Original Theano version |
|---|---|---|
| Branch | master (this branch) | original-theano-version |
| Multi-GPU support | Yes | No |
| FP16 mixed-precision support | Yes | No |
| Performance | High | Low |
| Training time for CelebA-HQ | 2 days (8 GPUs) 2 weeks (1 GPU) |
1–2 months |
| Repro CelebA-HQ results | Yes – very close | Yes – identical |
| Repro LSUN results | Yes – very close | Yes – identical |
| Repro CIFAR-10 results | No | Yes – identical |
| Repro MNIST mode recovery | No | Yes – identical |
| Repro ablation study (Table 1) | No | Yes – identical |
| Dataset format | TFRecords | HDF5 |
| Backwards compatibility | Can import networks trained with Theano |
N/A |
| Code quality | Reasonable | Somewhat messy |
System requirements
- Both Linux and Windows are supported, but we strongly recommend Linux for performance and compatibility reasons.
- 64-bit Python 3.6 installation with numpy 1.13.3 or newer. We recommend Anaconda3.
- One or more high-end NVIDIA Pascal or Volta GPUs with 16GB of DRAM. We recommend NVIDIA DGX-1 with 8 Tesla V100 GPUs.
- NVIDIA driver 391.25 or newer, CUDA toolkit 9.0 or newer, cuDNN 7.1.2 or newer.
- Additional Python packages listed in
requirements-pip.txt
Importing and using pre-trained networks
All pre-trained networks found on Google Drive, as well as ones produced by the training script, are stored as Python PKL files. They can be imported using the standard pickle mechanism as long as two conditions are met: (1) The directory containing the Progressive GAN code repository must be included in the PYTHONPATH environment variable, and (2) a tf.Session() object must have been created beforehand and set as default. Each PKL file contains 3 instances of tfutil.Network:
# Import official CelebA-HQ networks.
with open('karras2018iclr-celebahq-1024x1024.pkl', 'rb') as file:
    G, D, Gs = pickle.load(file)
    # G = Instantaneous snapshot of the generator, mainly useful for resuming a previous training run.
    # D = Instantaneous snapshot of the discriminator, mainly useful for resuming a previous training run.
    # Gs = Long-term average of the generator, yielding higher-quality results than the instantaneous snapshot.
It is also possible to import networks that were produced using the Theano implementation, as long as they do not employ any features that are not natively supported by the TensorFlow version (minibatch discrimination, batch normalization, etc.). To enable Theano network import, however, you must use misc.load_pkl() in place of pickle.load():
# Import Theano versions of the official CelebA-HQ networks.
import misc
G, D, Gs = misc.load_pkl('200-celebahq-1024x1024/network-final.pkl')
Once you have imported the networks, you can call Gs.run() to produce a set of images for given latent vectors, or Gs.get_output_for() to include the generator network in a larger TensorFlow expression. For further details, please consult the example script found on Google Drive. Instructions:
- Pull the Progressive GAN code repository and add it to your PYTHONPATH environment variable.
- Install the required Python packages with
pip install -r requirements-pip.txt - Download
import_example.pyfromnetworks/tensorflow-version/example_import_script - Download
karras2018iclr-celebahq-1024x1024.pklfromnetworks/tensorflow-versionand place it in the same directory as the script. - Run the script with
python import_example.py - If everything goes well, the script should generate 10 PNG images (
img0.png–img9.png) that match the ones found innetworks/tensorflow-version/example_import_scriptexactly.
Preparing datasets for training
The Progressive GAN code repository contains a command-line tool for recreating bit-exact replicas of the datasets that we used in the paper. The tool also provides various utilities for operating on the datasets:
usage: dataset_tool.py [-h] <command> ...

    display             Display images in dataset.
    extract             Extract images from dataset.
    compare             Compare two datasets.
    create_mnist        Create dataset for MNIST.
    create_mnistrgb     Create dataset for MNIST-RGB.
    create_cifar10      Create dataset for CIFAR-10.
    create_cifar100     Create dataset for CIFAR-100.
    create_svhn         Create dataset for SVHN.
    create_lsun         Create dataset for single LSUN category.
    create_celeba       Create dataset for CelebA.
    create_celebahq     Create dataset for CelebA-HQ.
    create_from_images  Create dataset from a directory full of images.
    create_from_hdf5    Create dataset from legacy HDF5 archive.

Type "dataset_tool.py <command> -h" for more information.
The datasets are represented by directories containing the same image data in several resolutions to enable efficient streaming. There is a separate *.tfrecords file for each resolution, and if the dataset contains labels, they are stored in a separate file as well:
> python dataset_tool.py create_cifar10 datasets/cifar10 ~/downloads/cifar10
> ls -la datasets/cifar10
drwxr-xr-x  2 user user         7 Feb 21 10:07 .
drwxrwxr-x 10 user user        62 Apr  3 15:10 ..
-rw-r--r--  1 user user   4900000 Feb 19 13:17 cifar10-r02.tfrecords
-rw-r--r--  1 user user  12350000 Feb 19 13:17 cifar10-r03.tfrecords
-rw-r--r--  1 user user  41150000 Feb 19 13:17 cifar10-r04.tfrecords
-rw-r--r--  1 user user 156350000 Feb 19 13:17 cifar10-r05.tfrecords
-rw-r--r--  1 user user   2000080 Feb 19 13:17 cifar10-rxx.labels
The create_* commands take the standard version of a given dataset as input and produce the corresponding *.tfrecords files as output. Additionally, the create_celebahq command requires a set of data files representing deltas with respect to the original CelebA dataset. These deltas (27.6GB) can be downloaded from datasets/celeba-hq-deltas.
Note about module versions: Some of the dataset commands require specific versions of Python modules and system libraries (e.g. pillow, libjpeg), and they will give an error if the versions do not match. Please heed the error messages — there is no way to get the commands to work other than installing these specific versions.
Training networks
Once the necessary datasets are set up, you can proceed to train your own networks. The general procedure is as follows:
- Edit
config.pyto specify the dataset and training configuration by uncommenting/editing specific lines. - Run the training script with
python train.py. - The results are written into a newly created subdirectory under
config.result_dir - Wait several days (or weeks) for the training to converge, and analyze the results.
By default, config.py is configured to train a 1024x1024 network for CelebA-HQ using a single-GPU. This is expected to take about two weeks even on the highest-end NVIDIA GPUs. The key to enabling faster training is to employ multiple GPUs and/or go for a lower-resolution dataset. To this end, config.py contains several examples for commonly used datasets, as well as a set of "configuration presets" for multi-GPU training. All of the presets are expected to yield roughly the same image quality for CelebA-HQ, but their total training time can vary considerably:
preset-v1-1gpu: Original config that was used to produce the CelebA-HQ and LSUN results shown in the paper. Expected to take about 1 month on NVIDIA Tesla V100.preset-v2-1gpu: Optimized config that converges considerably faster than the original one. Expected to take about 2 weeks on 1xV100.preset-v2-2gpus: Optimized config for 2 GPUs. Takes about 1 week on 2xV100.preset-v2-4gpus: Optimized config for 4 GPUs. Takes about 3 days on 4xV100.preset-v2-8gpus: Optimized config for 8 GPUs. Takes about 2 days on 8xV100.
For reference, the expected output of each configuration preset for CelebA-HQ can be found in networks/tensorflow-version/example_training_runs
Other noteworthy config options:
fp16: Enable FP16 mixed-precision training to reduce the training times even further. The actual speedup is heavily dependent on GPU architecture and cuDNN version, and it can be expected to increase considerably in the future.BENCHMARK: Quickly iterate through the resolutions to measure the raw training performance.BENCHMARK0: Same asBENCHMARK, but only use the highest resolution.syn1024rgb: Synthetic 1024x1024 dataset consisting of just black images. Useful for benchmarking.VERBOSE: Save image and network snapshots very frequently to facilitate debugging.GRAPHandHIST: Include additional data in the TensorBoard report.
Analyzing results
Training results can be analyzed in several ways:
- Manual inspection: The training script saves a snapshot of randomly generated images at regular intervals in
fakes*.pngand reports the overall progress inlog.txt. - TensorBoard: The training script also exports various running statistics in a
*.tfeventsfile that can be visualized in TensorBoard withtensorboard --logdir <result_subdir>. - Generating images and videos: At the end of
config.py, there are several pre-defined configs to launch utility scripts (generate_*). For example:- Suppose you have an ongoing training run titled
010-pgan-celebahq-preset-v1-1gpu-fp32, and you want to generate a video of random interpolations for the latest snapshot. - Uncomment the
generate_interpolation_videoline inconfig.py, replacerun_id=10, and runpython train.py - The script will automatically locate the latest network snapshot and create a new result directory containing a single MP4 file.
- Suppose you have an ongoing training run titled
- Quality metrics: Similar to the previous example,
config.pyalso contains pre-defined configs to compute various quality metrics (Sliced Wasserstein distance, Fréchet inception distance, etc.) for an existing training run. The metrics are computed for each network snapshot in succession and stored inmetric-*.txtin the original result directory.

 5 Jan 15, 2022
 284 Dec 23, 2022
 1 May 15, 2022
 2 Jan 26, 2022
 108 Dec 17, 2022
 214 Dec 29, 2022
 10 Dec 06, 2022
 3 Oct 31, 2022
 3.1k Jan 04, 2023
 27 Dec 23, 2022
 532 Jan 02, 2023
 38 Oct 16, 2022
 22 Dec 05, 2022
 164 Dec 30, 2022
 1 Mar 29, 2022
 805 Jan 09, 2023
 98 Dec 15, 2022
 14 Dec 21, 2022
 3 Dec 19, 2022
 126 Sep 13, 2022