2021AICompetition-03
본 repo 는 mAy-I Inc. 팀으로 참가한 2021 인공지능 온라인 경진대회 중 [이미지] 운전 사고 예방을 위한 운전자 부주의 행동 검출 모델] 태스크 수행을 위한 레포지토리입니다.
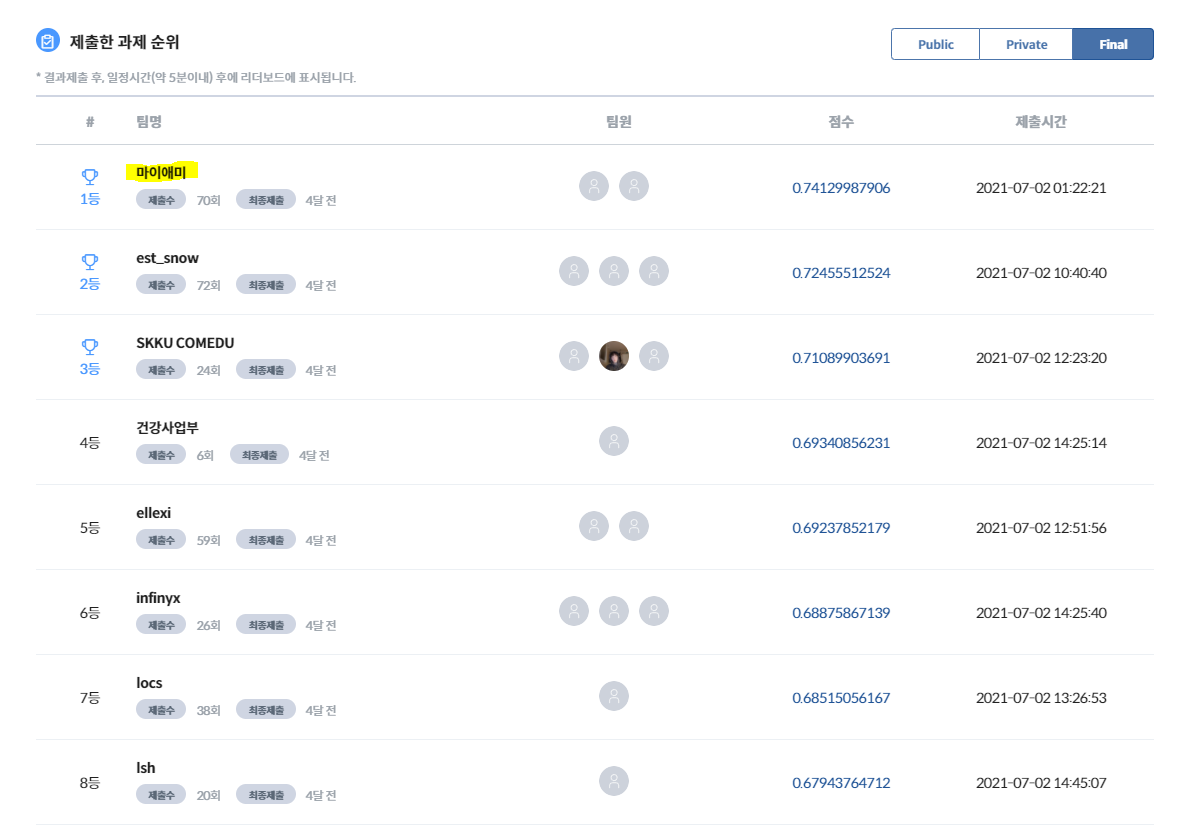
mAy-I 는 과학기술정보통신부가 주최하고 정보통신산업진흥원이 주관하는 2021 인공지능 온라인 경진대회 에 참가하여, 이미지 분야 177개 팀 중 최종 1위 를 달성하여 과학기술정보통신부장관상 을 수상하였습니다.
본 repo 는 그 중 [이미지] 운전 사고 예방을 위한 운전자 부주의 행동 검출 모델 태스크를 다루고 있으며, mAy-I 는 해당 태스크에서 Public/Private/Final 모든 데이터셋에 대해 종합 1위 를 달성하였습니다.
관련한 보다 자세한 소개는 mAy-I 테크 블로그에서 보실 수 있습니다: 2021 인공지능 온라인 경진대회 이미지 분야 1위 어떻게 했을까?
- 메이아이, ‘AI 온라인 경진대회’서 과기부 장관상 수상
- mAy-I 는 작년에도 3개 태스크에서 각각 1위, 2위, 2위를 달성하여 종합 5위에 랭크되었습니다:)
대회 중 작성하였었던 코드를 아카이빙하는 것이 목적이라, 별도의 문서화나 리팩토링을 거치지 않은 점, 양해 부탁드립니다:)
셋업
학습 및 추론을 위한 환경을 구축하는 단계입니다.
별도 셋업
별도의 환경을 위한 셋업 과정입니다. docker 가 설치되어 있고, dataset 이 알맞은 경로에 준비되어 있다면 생략할 수 있습니다.
docker 설치
본 repo 는 간편한 설치를 위해 docker 를 사용합니다. 서버에 docker 가 설치되어 있지 않은 경우 다음과 같은 방식으로 설치 가능합니다.
$ sudo apt-get remove docker docker-engine docker.io
$ sudo apt-get update && sudo apt-get install apt-transport-https ca-certificates curl software-properties-common
$ curl -fsSL https://download.docker.com/linux/ubuntu/gpg | sudo apt-key add -
$ sudo add-apt-repository "deb [arch=amd64] https://download.docker.com/linux/ubuntu $(lsb_release -cs) stable"

$ sudo apt-get update && sudo apt-cache search docker-ce
# Message: docker-ce - Docker: the open-source application container engine

$ sudo apt-get update && sudo apt-get install docker-ce
$ sudo usermod -aG docker $USER

$ curl -s -L https://nvidia.github.io/nvidia-docker/gpgkey | sudo apt-key add -
$ distribution=$(. /etc/os-release;echo $ID$VERSION_ID)
$ curl -s -L https://nvidia.github.io/nvidia-docker/$distribution/nvidia-docker.list | sudo tee /etc/apt/sources.list.d/nvidia-docker.list

$ sudo apt-get update && sudo apt-get install -y nvidia-container-toolkit
$ sudo systemctl restart docker
도중에 sudo: unable to resolve host 에러가 나오면 링크 로 해결하면 됩니다.
데이터 다운로드 및 셋업
제공된 데이터는 다음과 같은 경로에 셋업되어야 합니다.
- train 데이터 경로:
/DATA/Final_DATA/task03_train - test 데이터 경로:
/DATA/Final_DATA/task03_test
위와 같이 셋업되어 있지 않은 경우, 제시된 데이터 파일을 다운로드 받아 /DATA/Final_DATA/ 폴더에 놓은 후, 다음의 코드로 압축을 풀어 세팅합니다.
## 기본 제공 데이터를 drowsy_face_raw 폴더에 압축 해제
$ sudo unzip /DATA/Final_DATA/task03_train.zip -d /DATA/Final_DATA/task03_train
$ sudo unzip /DATA/Final_DATA/task03_test.zip -d /DATA/Final_DATA/task03_test

## 용량이 부족하다면 .zip 파일은 삭제
$ sudo rm ../drowsy_face_raw/task03_train.zip
$ sudo rm ../drowsy_face_raw/task03_test.zip
폴더 세팅
작업 폴더를 세팅하기 위해 제출한 코드를 ~/workspace/code/2021AICompetition-03 에 세팅합니다.
혹은 다음과 같이 git 에서 가져옵니다.
$ mkdir -p ~/workspace/code
(~/workspace/code) $ git clone https://github.com/PJunhyuk/2021AICompetition-03
** 이후의 모든 코드는 특별한 언급이 없다면 current work directory(~/workspace/code/2021AICompetition-03) 하에서의 실행을 전제합니다.
docker 및 git, ffmpeg (for opencv) 세팅
여러 docker image 중 nvidia/pytorch 의 기본 이미지를 활용하였습니다. 다음과 같은 방식으로 docker 를 가져오고, 기본 package 인 git 과 ffmpeg 를 설치합니다.
- 추가 설치가 워낙 간단하여, 별도로 docker image 파일을 만들지는 않았습니다.
$ docker pull nvcr.io/nvidia/pytorch:20.12-py3
$ docker run --gpus all --name 2021AICompetition-03 --shm-size 8G -v ~/workspace/code:/root/workspace/code -v /DATA:/DATA -it nvcr.io/nvidia/pytorch:20.12-py3

# Install git & ffmpeg
# 'glib2' is a dependency of 'opencv'
# type 6-69-6
$ apt-get update && apt-get install -y --no-install-recommends \
    git libxrender1 ffmpeg libglib2.0-0 && \
    rm -rf /var/lib/apt/lists/*
dependencies 설치
$ pip install -r requirements.txt
학습 및 추론
학습
$ python train.py
추론
$ python predict.py
코드 설명
repo 전반에 대한 상세 설명입니다.
Code file 에 대한 description
구조
Code file 은 다음과 같은 구조로 이루어져 있습니다.
~/workspace/code/2021AICompetition-03 (current work directory)
  /data
    drowsy_face.yaml
    drowsy_face_tuning.yaml
    hyp.scratch-p6.yaml
    hyp.finetune.yaml
    hyp.finetune-simple.yaml
  /models
    /hub
      yolov5l6.yaml
    *.py
  /utils
    *
  .gitignore
  README.md
  requirements.txt
  train.py
  predict.py
상세 설명
-
${PROJECT}/data/drowsy_face.yaml: baseline 학습 환경에 대한 정보가 담겨 있는 파일입니다. -
${PROJECT}/data/drowsy_face_tuning.yaml: fine-tuning 학습 환경에 대한 정보가 담겨 있는 파일입니다.drowsy_face.yaml파일과 train dataset 경로 부분에서만 차이가 있습니다. -
${PROJECT}/data/hyp.scratch-p6.yaml: baseline 학습에 필요한 hyperparameter 들의 정보가 담겨 있는 파일입니다. -
${PROJECT}/data/hyp.finetune.yaml: fine-tuning 학습에 필요한 hyperparameter 들의 정보가 담겨 있는 파일입니다. -
${PROJECT}/data/hyp.finetune-simple.yaml: fine-tuning 학습에 필요한 hyperparameter 들의 정보가 담겨 있는 파일입니다.hyp.finetune.yaml과 달리hsv_v,scale,mosaic를 사용하지 않습니다. -
${PROJECT}/models/hub/yolov5l6.yaml: 학습에 사용한 backbone 인yolov5l6에 대한 정보가 담겨 있는 파일입니다. -
${PROJECT}/models/*.py: yolov5 를 기반으로 하고 있는 파일들입니다. 원본 파일들과 크게 차이가 없습니다. -
${PROJECT}/utils/*: yolov5 를 기반으로 하고 있는 파일들입니다. 원본 파일들과 크게 차이가 없습니다. -
${PROJECT}/.gitignore: GitHub 를 위한.gitignore파일입니다. -
${PROJECT}/README.md: repo 전반에 대한 설명이 담겨 있는 파일입니다. -
${PROJECT}/requirements.txt: dependencies 가 담겨 있는 파일입니다. -
${PROJECT}/train.py: 학습에 사용하는 파일입니다. -
${PROJECT}/predictpy: 추론에 사용하는 파일입니다.
output 에 대한 description
구조
코드가 실행되면 기존 파일들 외에 다음과 같은 파일들이 생성됩니다.
~/workspace/code
  /2021AICompetition-03 (current work directory)
    /runs
      /train
        /final
          /weights
            last.pt
            best.pt
          *
        /final2
          /weights
            last.pt
            best.pt
          *
      /test
        /final
          last_predictions.json
          *
  /drowsy_face
    /images
      /train
      /val
    /labels
      /train
      /val
  /drowsy_face_diet
    /images
      /train
    /labels
      /train
상세 설명
~/workspace/code/2021AICompetition-03/runs~/workspace/code/drowsy_face/:train.py를 실행하면 생성되는 폴더입니다./DATA/Final_DATA의 데이터들을 train set 과 validation set 으로 나눈 후 yolo 형식에 맞춰 저장합니다.~/workspace/code/drowsy_face_diet/:train.py를 실행하면 생성되는 폴더입니다. data imbalance 문제를 해결하기 위해/DATA/Final_DATA의 데이터들을 특정 방식에 따라 추출하여 yolo 형식에 맞춰 저장합니다.
학습에 필요한 명령어
$ python train.py
플래그
위 명령어 만으로 모든 학습 프로세스를 돌릴 수 있지만, 편의를 위해 여러 플래그들이 존재합니다. 주로 사용하는 플래그들은 다음과 같습니다.
--no_data_prepare: 이미train.py가 한 번 이상 실행되어drowsy_face와drowsy_face_diet폴더가 세팅되어 있는 경우, 본 플래그를 사용하면 data prepare 과정을 생략하고 바로 학습을 진행합니다. (default: False)--batch 4: batch size 를 조절합니다. (default: 4)--device 0: 여러 개의 GPU 가 있는 서버에서 특정 번호의 GPU 만 사용합니다. (default: '')--img 640: input image size 입니다. (default: 1280)--name final: 결과 값이 저장되는 폴더의 이름입니다. (default: exp)
적절한 사용 예시는 다음과 같습니다.
$ python train.py --epochs 2 --save_period 2 --epochs_tune 2 --save_period_tune 2
$ python train.py --no_data_prepare --device 0 --batch 4 --img 640 --epochs 1 --save_period 1 --epoch_parts 300 --epochs_tune 1 --epoch_parts_tune 1000 --save_period_tune 1
학습시간
V100 환경에서 총 26시간 정도가 소요됩니다. 세부 구성은 다음과 같습니다.
- baseline train 에 21.5시간 정도가 소요됩니다. (300 epochs completed in 21.028 hours.)
- 1 epoch 학습하는데에 4분 10초 정도 소요됩니다.
- 학습이 끝난 후 /drowsy_face/val 에 대해 validation 을 진행합니다. 6분 정도 소요됩니다.
- fine-tuning 에 4.5시간 정도가 소요됩니다. (50 epochs completed in 4.295 hours.)
- 1 epoch 학습하는데에 5분 정도 소요됩니다.
- 학습이 끝난 후 /drowsy_face/val 에 대해 validation 을 진행합니다. 6분 정도 소요됩니다.
학습/추론 속도 체크를 위해 NAVER CLOUD PLATFORM 의 GPU Server 를 생성하여 사용했습니다.
서버 스펙
- CPU: 8 vCPUs
- RAM: 90GB
- GPU: Tesla V100
- VRAM: 32GB
- OS: Ubuntu 16.04
서버 상태
# CUDA
$ nvcc --version # 10.0.130

# nvidia-driver
$ nvidia-smi # 418.67, Tesla V100-SXM2..., 32480MiB

# Ubuntu
$ lsb_release -a # Ubuntu 16.04.1 LTS
학습 과정
위 명령어를 통해 수행되는 전체 학습 과정은 크게 3개의 단계로 이루어져 있습니다.
1. data_prepare
/DATA/Final_DATA 를 yolo 형태의 data 로 변환하는 과정입니다.
-
원본 data 는 data imbalance 문제가 심각하여, 그대로 학습하면 적은 개수의 class 들이 잘 학습되지 않습니다. 때문에 이러한 부분을 보정할 수 있도록 데이터를 추출하여 drowsy_face_diet/train 을 생성합니다.
-
drowsy_face_diet/train 을 생성하는 알고리즘은 다음과 같습니다.
- cigar 가 있거나 phone 이 있으면 drowsy_face_diet/train 에 넣습니다.
- eye_closed 와 mouth_closed 가 동시에 있으면 drowsy_face_diet/train 에 넣습니다.
- eye_closed 와 mouth_opened 가 동시에 있으면 drowsy_face_diet/train 에 넣습니다.
- mouth_opened 가 있는 이미지 중 1/3 을 drowsy_face_diet/train 에 넣습니다.
-
전체 train data 중 random 하게 20000개를 추출하여 drowsy_face/val 에 저장합니다. 남은 data 들은 drowsy_face/train 에 저장합니다.
-
이 과정을 통해 생성된 셋들의 class 별 분포는 다음과 같습니다.
generate raw_train.json, raw_val.json
100%|██████████████████████████████████████████████████████████████████████████████████████████████████████████████████████████████████████████████████████████████████| 273224/273224 [02:17<00:00, 1991.69it/s]
generate drowsy_face/train, drowsy_face/val
100%|████████████████████████████████████████████████████████████████████████████████████████████████████████████████████████████████████████████████████████████████████| 20000/20000 [00:08<00:00, 2485.50it/s]
100%|██████████████████████████████████████████████████████████████████████████████████████████████████████████████████████████████████████████████████████████████████| 253224/253224 [01:47<00:00, 2346.73it/s]
generate diet_train.json
100%|████████████████████████████████████████████████████████████████████████████████████████████████████████████████████████████████████████████████████████████████| 273224/273224 [00:00<00:00, 543536.13it/s]
generate drowsy_face_diet/train
100%|████████████████████████████████████████████████████████████████████████████████████████████████████████████████████████████████████████████████████████████████████| 56747/56747 [00:27<00:00, 2091.26it/s]
count classes
diet_train.json
100%|██████████████████████████████████████████████████████████████████████████████████████████████████████████████████████████████████████████████████████████████████| 56747/56747 [00:00<00:00, 500054.98it/s]
{'eye_opened': 61941, 'eye_closed': 47630, 'mouth_opened': 23254, 'mouth_closed': 25658, 'face': 56738, 'phone': 12687, 'cigar': 11370}
raw_train.json
100%|████████████████████████████████████████████████████████████████████████████████████████████████████████████████████████████████████████████████████████████████| 253224/253224 [00:00<00:00, 619673.71it/s]
{'eye_opened': 419135, 'eye_closed': 74551, 'mouth_opened': 35233, 'mouth_closed': 127282, 'face': 253167, 'phone': 11792, 'cigar': 10499}
raw_val.json
100%|██████████████████████████████████████████████████████████████████████████████████████████████████████████████████████████████████████████████████████████████████| 20000/20000 [00:00<00:00, 449781.67it/s]
{'eye_opened': 32994, 'eye_closed': 5975, 'mouth_opened': 2823, 'mouth_closed': 9851, 'face': 19997, 'phone': 895, 'cigar': 871}
2. baseline 학습
drowsy_face_diet/train 을 학습합니다.
- 300 epoch 학습하며, hyp.scratch-p6.yaml 과 drowsy_face.yaml 을 사용합니다.
- 모든 train set 을 학습하면 시간이 너무 오래 걸리기 때문에, RandomSampler 를 사용하여 전체 데이터셋 중 일부만 사용합니다. 해당 부분은 epoch_parts 라는 변수로 관리되며, default 값은 15 로, 전체 데이터셋을 매 epoch 마다 랜덤하게 15등분하여 그 중 첫 번째 셋을 사용합니다.
- 300 epoch 학습이 끝난 후 drowsy_face/val 에 대해 validation 을 수행합니다.
3. fine-tuning 학습
위 baseline 과정을 거치면 수가 적은 phone 과 cigar 과 같이 개수가 적은 class 들에 대해서는 높은 성능을 보여주나, face 와 같이 개수가 많은 class 들에 대해서는 상대적으로 낮은 성능을 보여줍니다. 이를 해결하기 위해 제공된 데이터셋과 class 분포가 같은 drowsy_face/train 을 사용하여 fine-tuning 합니다.
- 50 epoch 학습하며, hyp.finetune-simple.yaml 과 drowsy_face_tuning.yaml 을 사용합니다.
- 마찬가지로 RandomSampler 를 사용합니다. 해당 부분은 epoch_parts_tune 이라는 변수로 관리되며, default 값은 50 입니다.
- 50 epoch fine-tuning 이 끝난 후 drowsy_face/val 에 대해 validation 을 수행합니다.
추론 결과
위 과정은 baseline 학습과 fine-tuning 을 동시에 진행합니다. default 설정으로 새로운 환경에서 그대로 실행할 경우, 각각의 weight 는 다음의 경로에 저장됩니다.
- baseline:
runs/train/final/weights/last.pt - fine-tuning:
runs/train/final2/weights/last.pt
추론에 필요한 명령어
$ python predict.py
현재는 사전에 학습된 weights/weights_baseline.pt 와 weights/weights_tuned.pt 를 사용하여 추론을 진행하도록 하드코딩 되어있습니다. 만약 학습으로 얻은 새로운 weight 파일으로 추론을 진행하고 싶다면 다음의 명령어를 사용합니다.
$ python predict.py --weights runs/train/final/weights/last.pt runs/train/final2/weights/last.pt
추론 시간
V100 환경에서 ensemble 기준 총 1시간 정도가 소요됩니다.
추론 과정
학습 과정을 통해 생성된 2개의 weight 를 사용하여 ensemble 을 진행합니다.
추론 결과
추론 결과는 runs/test/final 경로 아래에 저장됩니다. 최종 제출 파일은 폴더 내의 last_predictions.json 에 저장됩니다.
Reproducibility
본 repo 에서는 다양한 방법으로 Reproducibility 를 제어하고 있습니다.
- 우선
train.py에서__main__함수가 시작된 직후 다음과 같은 방식으로 Reproducibility 를 제어합니다.
# Reproducibility
torch.manual_seed(opt.random_seed)
torch.cuda.manual_seed(opt.random_seed)
torch.cuda.manual_seed_all(opt.random_seed) # if use multi-GPU
torch.backends.cudnn.deterministic = True
torch.backends.cudnn.benchmark = False
np.random.seed(opt.random_seed)
random.seed(opt.random_seed)
- 기본적으로도
utils/general.py에서init_seeds함수를 통해 Reproducibility 를 제어합니다.
def init_seeds(seed=0):
    # Initialize random number generator (RNG) seeds
    random.seed(seed)
    np.random.seed(seed)
    init_torch_seeds(seed)
그러나 PyTorch 는 공식적으로 완벽히 Reproducibility 를 제어할 수 없습니다. 대표적으로 CUDA 함수를 사용하는 PyTorch 함수들 중 nondeterministic 한 함수들이 존재합니다. 본 repo 는 이 중 불가피하게 torch.nn.funcional.interpolate() 를 사용하고 있어, 완벽한 Reproducibility 제어가 불가합니다.
실제로 매 iter 마다 loss 를 찍어본 결과, 초반 1-20 iter 정도는 모든 loss 가 같게 나왔지만, 어느 순간부터 obj loss 가 다르게 찍히기 시작하고, 이걸 시작으로 다른 loss 들도 다르게 계산되는 모습을 확인할 수 있었습니다.
- 위에 언급한
torch.nn.funcional.interpolate()함수 혹은 obj loss 를 계산하는 과정에서 연산되는bcewithlogitsloss에서 Reproducibility 가 깨지는 것으로 추정됩니다.
때문에 본 repo 에서는 완벽한 Reproducibility 가 구현되어 있지 않습니다.
다만, 서로 다른 서버 환경에서 본 repo 의 설정대로 학습 및 추론을 진행하여 제출해 본 결과, Public testset 에 대해 각각 0.7459674232 (best, 66번째 submission) , 0.7378836101 (65번째 submission) 0.7320975839 (61번째 submission) 의 결과를 얻을 수 있었고, 해당 결과는 모두 리더보드 기준 2등에 위치한 est_snow 팀의 0.732055294 보다 높아, 순위에는 영향을 주지 않을 것으로 예상됩니다.

 95 Nov 22, 2022
 7 Feb 10, 2022
 7 Aug 04, 2022
 20 Dec 16, 2022
 210 Dec 31, 2022
 135 Dec 23, 2022
 83 Jan 04, 2023
 2.8k Dec 29, 2022
 66 Dec 11, 2022
 10.9k Jan 01, 2023
 88 Dec 21, 2022
 19 Dec 01, 2022
 6 Feb 03, 2022
 26 Oct 06, 2022
 81 Dec 15, 2022
 187 Dec 26, 2022
 103 Nov 25, 2022
 8 Dec 04, 2022
 5 Jan 28, 2022
 78 Nov 29, 2022