DeepOSM 

Classify roads and features in satellite imagery, by training neural networks with OpenStreetMap (OSM) data.
DeepOSM can:
- Download a chunk of satellite imagery
- Download OSM data that shows roads/features for that area
- Generate training and evaluation data
- Display predictions of mis-registered roads in OSM data, or display raw predictions of ON/OFF
Running the code is as easy as install Docker, make dev, and run a script.
Contributions are welcome. Open an issue if you want to discuss something to do, or email me.
Default Data/Accuracy
By default, DeepOSM will analyze about 200 sq. km of area in Delaware. DeepOSM will
- predict if the center 9px of a 64px tile contains road.
- use the infrared (IR) band and RGB bands.
- be 75-80% accurate overall, training only for a minute or so.
- use a single fully-connected relu layer in TensorFlow.
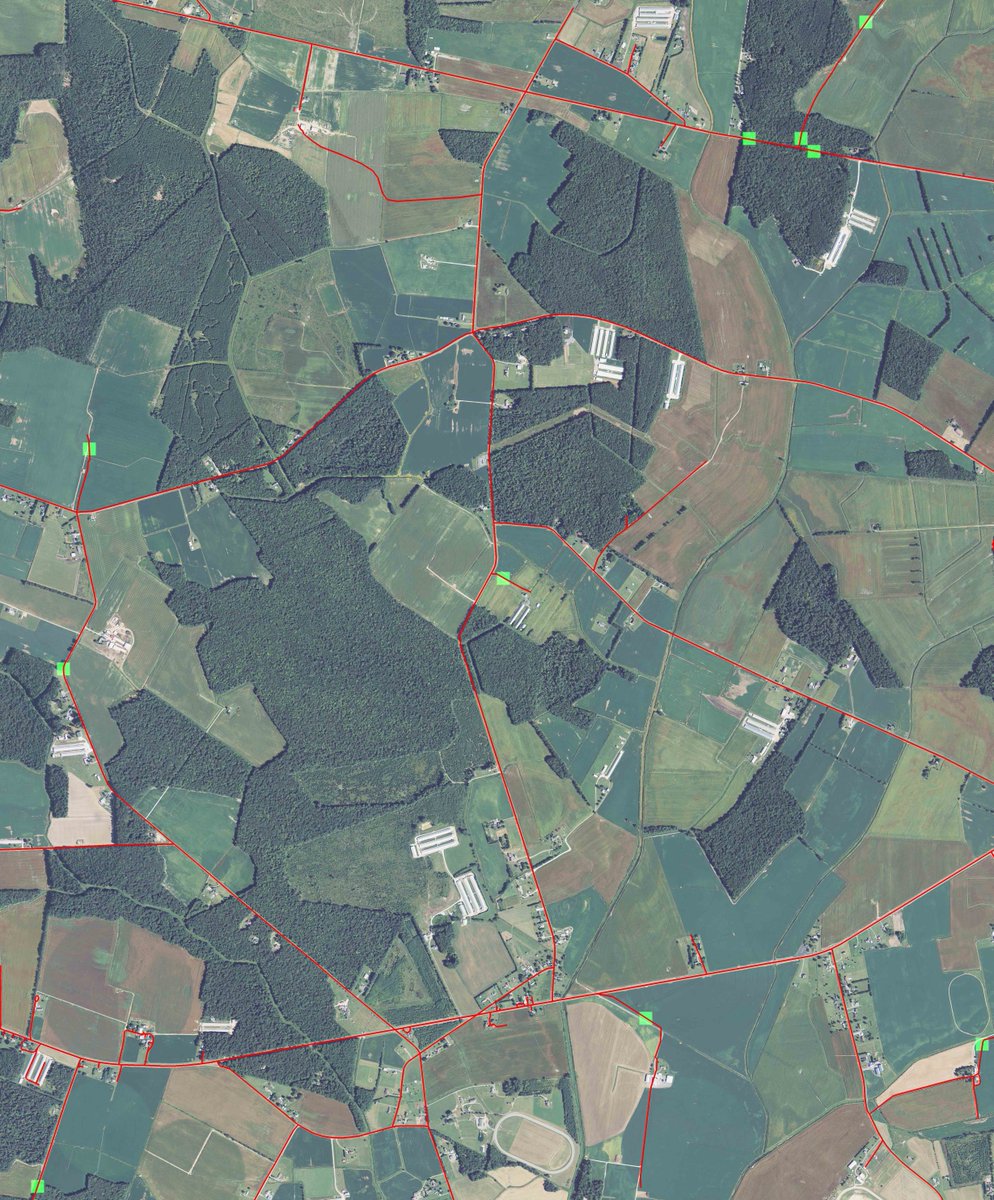
- render, as JPEGs, "false positive" predictions in the OSM data - i.e. where OSM lists a road, but DeepOSM thinks there isn't one.
Background on Data - NAIPs and OSM PBF
For training data, DeepOSM cuts tiles out of NAIP images, which provide 1-meter-per-pixel resolution, with RGB+infrared data bands.
For training labels, DeepOSM uses PBF extracts of OSM data, which contain features/ways in binary format that can be munged with Python.
The NAIPs come from a requester pays bucket on S3 set up by Mapbox, and the OSM extracts come from geofabrik.
Install Requirements
DeepOSM has been run successfully on both Mac (10.x) and Linux (14.04 and 16.04). You need at least 4GB of memory.
AWS Credentials
You need AWS credentials to download NAIPs from an S3 requester-pays bucket. This only costs a few cents for a bunch of images, but you need a credit card on file.
-
get your AWS_ACCESS_KEY_ID and AWS_SECRET_ACCESS_KEY from AWS
-
export them as environment variables (and maybe add to your bash or zprofile)
export AWS_ACCESS_KEY_ID='FOO'
export AWS_SECRET_ACCESS_KEY='BAR'
Install Docker
First, install a Docker Binary.
I also needed to set my VirtualBox default memory to 4GB, when running on a Mac. This is easy:
- start Docker, per the install instructions
- stop Docker
- open VirtualBox, and increase the memory of the VM Docker made
(GPU Only) Install nvidia-docker
In order to use your GPU to accelerate DeepOSM, you will need to download and install the latest NVIDIA drivers for your GPU, and (after first installing docker itself), install nvidia-docker.
First, find the latest NVIDIA drivers for your GPU on NVIDIA's website. Make sure you check the version number of the driver, as the most recent release isn't always the latest version.
Once you have downloaded the appropriate NVIDIA-*.run file, install it as follows (based on these instructions):
Ensure your system is up-to-date and reboot to ensure the latest installed kernel is loaded:
# ensure your packages are up-to-date
sudo apt-get update
sudo apt-get dist-upgrade
# and reboot
sudo reboot
Once your system has rebooted, install build-essential and the linux-headers package for your current kernel version (or equivalents for your linux distribution):
sudo apt-get install build-essential linux-headers-$(uname -r)
Then run the NVIDIA driver install you downloaded earlier, and reboot your machine afterwards:
sudo bash <location of ./NVIDIA-Linux-*.run file>
sudo reboot
Finally, verify that the NVIDIA drivers are installed correctly, and your GPU can be located using nvidia-smi:
nvidia-smi
Thu Mar  9 03:40:33 2017
+-----------------------------------------------------------------------------+
| NVIDIA-SMI 367.57                 Driver Version: 367.57                    |
|-------------------------------+----------------------+----------------------+
| GPU  Name        Persistence-M| Bus-Id        Disp.A | Volatile Uncorr. ECC |
| Fan  Temp  Perf  Pwr:Usage/Cap|         Memory-Usage | GPU-Util  Compute M. |
|===============================+======================+======================|
|   0  GRID K520           Off  | 0000:00:03.0     Off |                  N/A |
| N/A   54C    P0    45W / 125W |      0MiB /  4036MiB |      0%      Default |
+-------------------------------+----------------------+----------------------+

+-----------------------------------------------------------------------------+
| Processes:                                                       GPU Memory |
|  GPU       PID  Type  Process name                               Usage      |
|=============================================================================|
|  No running processes found                                                 |
+-----------------------------------------------------------------------------+
Now that the NVIDIA drivers are installed, nvidia-docker can be downloaded and installed as follows (based on these instructions):
wget -P /tmp https://github.com/NVIDIA/nvidia-docker/releases/download/v1.0.1/nvidia-docker_1.0.1-1_amd64.deb
sudo dpkg -i /tmp/nvidia-docker*.deb && rm /tmp/nvidia-docker*.deb
And you can confirm the installation, by attempting to run nvida-smi inside of a docker container:
nvidia-docker run --rm nvidia/cuda nvidia-smi
Using default tag: latest
latest: Pulling from nvidia/cuda
d54efb8db41d: Pull complete
f8b845f45a87: Pull complete
e8db7bf7c39f: Pull complete
9654c40e9079: Pull complete
6d9ef359eaaa: Pull complete
cdfa70f89c10: Pull complete
3208f69d3a8f: Pull complete
eac0f0483475: Pull complete
4580f9c5bac3: Pull complete
6ee6617c19de: Pull complete
Digest: sha256:2b7443eb37da8c403756fb7d183e0611f97f648ed8c3e346fdf9484433ca32b8
Status: Downloaded newer image for nvidia/cuda:latest
Thu Mar  9 03:44:23 2017
+-----------------------------------------------------------------------------+
| NVIDIA-SMI 367.57                 Driver Version: 367.57                    |
|-------------------------------+----------------------+----------------------+
| GPU  Name        Persistence-M| Bus-Id        Disp.A | Volatile Uncorr. ECC |
| Fan  Temp  Perf  Pwr:Usage/Cap|         Memory-Usage | GPU-Util  Compute M. |
|===============================+======================+======================|
|   0  GRID K520           Off  | 0000:00:03.0     Off |                  N/A |
| N/A   54C    P8    18W / 125W |      0MiB /  4036MiB |      0%      Default |
+-------------------------------+----------------------+----------------------+

+-----------------------------------------------------------------------------+
| Processes:                                                       GPU Memory |
|  GPU       PID  Type  Process name                               Usage      |
|=============================================================================|
|  No running processes found                                                 |
+-----------------------------------------------------------------------------+
Once you have confirmed nvidia-smi works inside of nvidia-docker, you should be able to run DeepOSM using your GPU.
Run Scripts
Start Docker, then run:
make dev-gpu
Or if you don't have a capable GPU, run:
make dev
Download NAIP, PBF, and Analyze
Inside Docker, the following Python scripts will work. This will download all source data, tile it into training/test data and labels, train the neural net, and generate image and text output.
The default data is six NAIPs, which get tiled into 64x64x4 bands of data (RGB-IR bands). The training labels derive from PBF files that overlap the NAIPs.
python bin/create_training_data.py
python bin/train_neural_net.py
For output, DeepOSM will produce some console logs, and then JPEGs of the ways, labels, and predictions overlaid on the tiff.
Testing
There is a very limited test suite available at the moment, that can be accessed (from the host system) by running:
make test
Jupyter Notebook
Alternately, development/research can be done via jupyter notebooks:
make notebook
To access the notebook via a browser on your host machine, find the IP VirtualBox is giving your default docker container by running:
docker-machine ls

NAME      ACTIVE   DRIVER       STATE     URL                         SWARM   DOCKER    ERRORS
default   *        virtualbox   Running   tcp://192.168.99.100:2376           v1.10.3
The notebook server is accessible via port 8888, so in this case you'd go to: http://192.168.99.100:8888
Readings
-
Learning to Detect Roads in High-Resolution Aerial Images (Hinton)
-
Machine Learning for Aerial Image Labeling- Minh's 2013 thesis, student of Hinton's best/recent paper on doing this, great success with these methods
-
Similar Efforts with OSM Data
- OSM-Crosswalk-Detection - uses Keras to detect crosswalks, a class project (Fall 2015)
- OSM-HOT-ConvNet - attempted use for disaster response, author thinks it's only 69% accurate at pixel level (fall 2016)
- Terrapattern - (spring 2016) - detect similar images, such as pools, boat wakes, or other patterns journalists/researchers might be interested in - Carnegie Mellon researchers, open source
- Skynet Data - (spring 2016) - data pipeline for machine learning with OpenStreetMap
- Full implementation of Mnih's CNN with Massachusetts data
-
Parsing Natural Scenes and Natural Language with Recursive Neural Networks (RNNs)
-
Background on Neural Networks and Deep Learning
- MNIST Data and Background
- all the other links to Nielsen’s book and Colah’s blog
- original Information Theory paper by Shannon
Papers - Relevant Maybe
-
Aerial image geolocalization from recognition and matching of roads and intersections - May 2016
-
Uses a large window to improve predictions, trying to capture broad network topology.
Papers - Not All that Relevant
-
New technique for classification of sub-half-meter data into different zones.
-
Proposes a way to extract network topology, and maybe this can be used as a post processor?
Papers to Review
Recent Recommendations
-
FIND - have you seen a paper from a few years ago about estimating OSM completeness by comparing size of compressed satellite images vs number of osm nodes
-
READ - this presentation on using GPS traces to suggest OSM edits (Strava/Telenav): http://webcache.googleusercontent.com/search?q=cache:VoiCwRHOyLUJ:stateofthemap.us/map-tracing-for-millennials/+&cd=3&hl=en&ct=clnk&gl=us
Citing Mnih and Hinton
I am reviewing these papers from Google Scholar that both cite the key papers and seem relevant to the topic.
-
http://www.tandfonline.com/doi/abs/10.1080/15481603.2013.802870
-
https://www.computer.org/csdl/proceedings/icpr/2014/5209/00/5209d708-abs.html
-
http://opticalengineering.spiedigitallibrary.org/article.aspx?articleid=1679147
-
http://proceedings.spiedigitallibrary.org/proceeding.aspx?articleid=1354584
-
http://citeseerx.ist.psu.edu/viewdoc/summary?doi=10.1.1.309.8565
-
http://proceedings.spiedigitallibrary.org/proceeding.aspx?articleid=2191094
-
http://www.sciencedirect.com/science/article/pii/S0924271615001690
-
https://www.itc.nl/external/ISPRS_WGIII4/ISPRSIII_4_Test_results/papers/Onera_2D_label_Vaih.pdf
-
http://link.springer.com/chapter/10.1007/978-3-319-23528-8_33#page-1
-
http://www.tandfonline.com/doi/abs/10.1080/01431161.2015.1054049
-
http://citeseerx.ist.psu.edu/viewdoc/download?doi=10.1.1.681.1695&rep=rep1&type=pdf
-
http://www.tandfonline.com/doi/abs/10.3846/20296991.2014.890271
-
http://www.sciencedirect.com/science/article/pii/S0303243415300283
Original Idea
This was the general idea to start, and working with TMS tiles sort of worked (see first 50 or so commits), so DeepOSM got switched to better data:


 55 Sep 13, 2022
 3 Oct 20, 2020
 1 Dec 12, 2021
 36 Oct 04, 2022
 80 Dec 21, 2022
 63 Dec 22, 2022
 28 Jan 04, 2023
 62 Dec 28, 2022
 7.7k Jan 05, 2023
 36 Dec 28, 2022
 44 Dec 10, 2022
 74 Dec 03, 2022
 224 Jan 04, 2023
 110 Nov 21, 2022
 405 Jan 02, 2023
 83 Dec 15, 2022
 1 Oct 15, 2021
 15 Dec 12, 2022
 4 Jun 18, 2022
 43 Sep 12, 2022