Raspberry Pi Pico as a Rubber Ducky

Overview

Raspberry-Pi-Pico-as-a-Rubber-Ducky

2022-02-09-16-58-32_Trim

Kurulum

  1. Raspberry Pi Pico cihazınız için CircuitPython'u indirin.
  2. Boot düğmesine basılı tutarken cihazı bir USB bağlantı noktasına takın ve cihazı taktıktan sonra boot tuşundan elinizi çekin. Bunun sonucunda "RPI-RP2" adlı çıkarılabilir bir medya aygıtı karşınıza çıkacaktır.
  3. İndirdiğiniz .uf2 dosyasını Pico'nun (RPI-RP2) ana dizinine kopyalayın. Bir süre sonra cihaz yeniden başlayacak ve 1-2 saniye sonra CIRCUITPY adında çıkarılabilir bir medya aygıtı olarak karşınıza çıkacaktır.
  4. Ardından adafruit-circuitpython-bundle-7.x-mpy-YYYYMMDD.zip dosyasını indirin ve cihazın dışına çıkarın.
  5. adafruit-circuitpython-bundle-7.x-mpy-YYYYMMDD klasörü altındaki "lib" klasörüne gidin ve "adafruit_hid'i" Raspberry Pi Pico'nuzdaki lib klasörüne kopyalayın.
  6. Buradaki sayfaya giderek CTRL + S tuşlarına basın ve dosyayı Pico'nun içerisinde bulunan code.py dosyasının üzerine yazarak Raspberry Pi Pico'nun ana dizinine "code.py" olarak kaydedin.
  7. Buradaki linkten bir script bulun veya kendi Rubber Ducky scriptinizi oluşturun ve "payload.dd" olarak kaydedin.
  8. Dikkat edin, son işlemden sonra cihaz yeniden başlatılacak ve yarım saniye sonra komut dosyası (payload.dd) çalışacaktır.

USB Etkinleştirme/Devre Dışı Bırakma

Pico'nun gizlilik amacıyla bir USB depolama aygıtı gibi görünmemesine istiyorsanız;

  1. Cihazı USB bağlantı noktasına takın.
  2. "boot.py" dosyasını Pico'nun (RPI-RP2) ana dizinine kopyalayın.
  3. payload.dd dosyanızı da Pico'ya (RPI-RP2) kopyalayın.
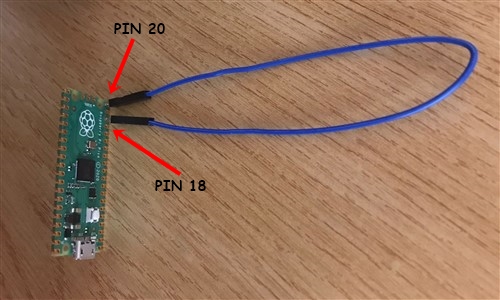
  4. Pico'yu bilgisayarınızdan çıkarın. Pin 18 ve pin 20 arasına bir jumper kablosu bağlayın. Bu durum Pico üzerinde bir kısa devre yaratacaktır ve hedef bilgisayara takıldığında Pico'nun bir USB sürücüsü olarak görünmesini engelleyecek.
  5. Tekrar programlamak için (Payload'ınızı güncellemek için) jumper kabloyu çıkarın ve PC'nize yeniden bağlayın. Varsayılan modda, USB depolama aygıtı aktif durumda olacaktır.

1

Klavye Düzenlerini Değiştirme

Varsayılan modda klavye düzeni İngilizce'dir. Bunu değiştirmek isterseniz;

  1. https://kbdlayout.info/ sayfasından istediğiniz klavye düzenini bularak üzerine tıklayın ve linki kopyalayıp https://www.neradoc.me/layouts/ sayfasındaki kutucuğa yapıştırın. Ardından "Make Zip Bundle Links" butonuna tıklayın.
  2. Ardından "Download the zip file (.py)" butonuna tıklayın.
  3. İndirilen dosyanın içerisinden kendize uygun olan klavye düzeninin dosyalarını Pico'nuzun içerisindeki lib klasörü altına kopyalayın (ben Türkçe Q klavye düzenini tercih ediyorum);
  • keyboard_layout.mpy
  • keyboard_layout_win_tuq.mpy
  • keycode_win_tuq.mpy

2

Dil Dosyanızı Kullanmak için Pico Kodunuzu Değiştirin

Pico içerisindeki "code.py" dosyasını açın ve içerisindeki şu kodu;

from adafruit_hid.keyboard_layout_us import KeyboardLayoutUS as KeyboardLayout
from adafruit_hid.keycode import Keycode

aşağıdaki kod ile değiştirin;

from keyboard_layout_win_tuq import KeyboardLayout
from keycode_win_tuq import Keycode
Owner
Furkan Enes POLATOĞLU
Cyber Security Researcher, SOC Analyst, CENG, YnVsbGV0cHJvb2Y=
Furkan Enes POLATOĞLU
This repository contains all the code and files needed to simulate the notspot quadrupedal robot using Gazebo and ROS.

Notspot robot simulation - Python version This repository contains all the files and code needed to simulate the notspot quadrupedal robot using Gazeb

50 Sep 26, 2022
Vvim - Keyboardless Vim interactions

This is done via a hardware glove that the user wears. The glove detects the finger's positions and translates them into key presses. It's currently a work in progress.

Boyd Kane 8 Nov 17, 2022
Homeautomation system created with Raspberry Pi 3 and Firebase.

Homeautomation System - Raspberry Pi 3 Desenvolvido com Python, Flask com AJAX e Firebase permite o controle local e remoto Itens necessários Raspberr

Joselino Santos 0 Mar 09, 2022
Shotgrid Toolkit Engine for Gaffer

Shotgun toolkit engine for Gaffer Contact : Diego Garcia Huerta Overview Implementation of a shotgun engine for Gaffer. It supports the classic bootst

Diego Garcia Huerta 12 May 21, 2022
Yet another automation project because a smart light is more than just on or off.

Automate home Yet another home automation project because a smart light is more than just on or off. Overview When talking about home automation there

Maja Massarini 62 Oct 10, 2022
Python module for the qwiic serial control motor driver

Qwiic_SCMD_Py Python module for the qwiic motor driver This python package is a port of the existing SparkFun Serial Controlled Motor Driver Arduino L

SparkFun Electronics 6 Dec 06, 2022
OPNsense integration with Home Assistant

hass-opnsense Join OPNsense with home-assistant! hass-opnsense uses the built-in xmlrpc service of OPNsense for all interactions. This project is curr

Travis Glenn Hansen 54 Jan 03, 2023
A iot Bike sytem based on RaspberryPi, Ardiuino

Cyclic 's Kernel ---- A iot Bike sytem based on RaspberryPi, Ardiuino, etc 0x1 What is This? Cyclic 's Kernel is an independent System With self-produ

Retr0mous 2 Oct 09, 2022
It is a program that displays the current temperature of the GPU and CPU in real time and stores the temperature history.

HWLogger It is a program that displays the current temperature of the GPU and CPU in real time and stores the temperature history. Sample Usage Run HW

Xeros 0 Apr 05, 2022
Code reimplementation of some papers published in SAIL-Lab

SAIL SAIL-Lab统一代码库 Motivation 创建这个项目的动机最早来源于实验室组内成员相互Debug代码的时候遇到的麻烦。

Jianwen Chen 8 Nov 15, 2022
Play a song with a 3D printer.

MIDI to GCODE Play a song with a FDM 3D printer. SLA printers don't have motors, so they cannot play music. Warning: Be ready to turn off the 3D print

Patrick 6 Apr 11, 2022
For use with an 8-bit parallel TFT touchscreen using micropython

ILI9341-parallel-TFT-driver-for-micropython For use with an 8-bit parallel TFT touchscreen using micropython. Many thanks to prenticedavid and his MCU

3 Aug 02, 2022
A Fast, Easy, and User Friendly way to control Robotics Actuators.

T-Motor Controller A Fast, Easy, and User Friendly way to control Robotics Actuators. View Demo · Report Bug · Request Feature Table of Contents About

26 Aug 23, 2022
Blender Camera Switcher

Blender Camera Switcher A simple camera switcher addon for blender. Useful when use reference image for camera. This addon will automatically fix the

Corgice 1 Jan 31, 2022
An arduino/ESP project that can play back G-Force data previously recorded

An arduino/ESP project that can play back G-Force data previously recorded

7 Apr 12, 2022
PBA: Pleco Breeding Assistant

A small monitor that reports the external, fishroom and water change parameters to have suitable water parameters and induce breeding. These two features already represent 50% of the "reproductive su

Mirko Mancin 1 Jan 19, 2022
Provide Unifi device info via api to Home Assistant that will give ap sensors

Unifi AP Device info Provide Unifi device info via api to Home Assistant that will give ap sensors

12 Jan 07, 2023
raspberry pi servo control using pca9685

RPi_servo-control_pca9685 raspberry pi 180° servo control using pca9685 Requirements Requires you to have the adafruit servokit library installed You

1 Jan 10, 2022
Detic ros - A simple ROS wrapper for Detic instance segmentation using pre-trained dataset

Detic ros - A simple ROS wrapper for Detic instance segmentation using pre-trained dataset

Hirokazu Ishida 12 Nov 19, 2022
Switch predictor for Home Assistant with AppDeamon

Home Assistant AppDeamon - Event predictor WORK IN PROGRESS - CURRENTLY NOT COMPLETE AND NOT WORK This is an idea under development (when I have free

37 Dec 17, 2022