基于Flask开发后端、VUE开发前端框架,在WEB端部署YOLOv5目标检测模型

Overview

1. 效果:

视频链接:

https://www.bilibili.com/video/BV1Wr4y1K7Sh

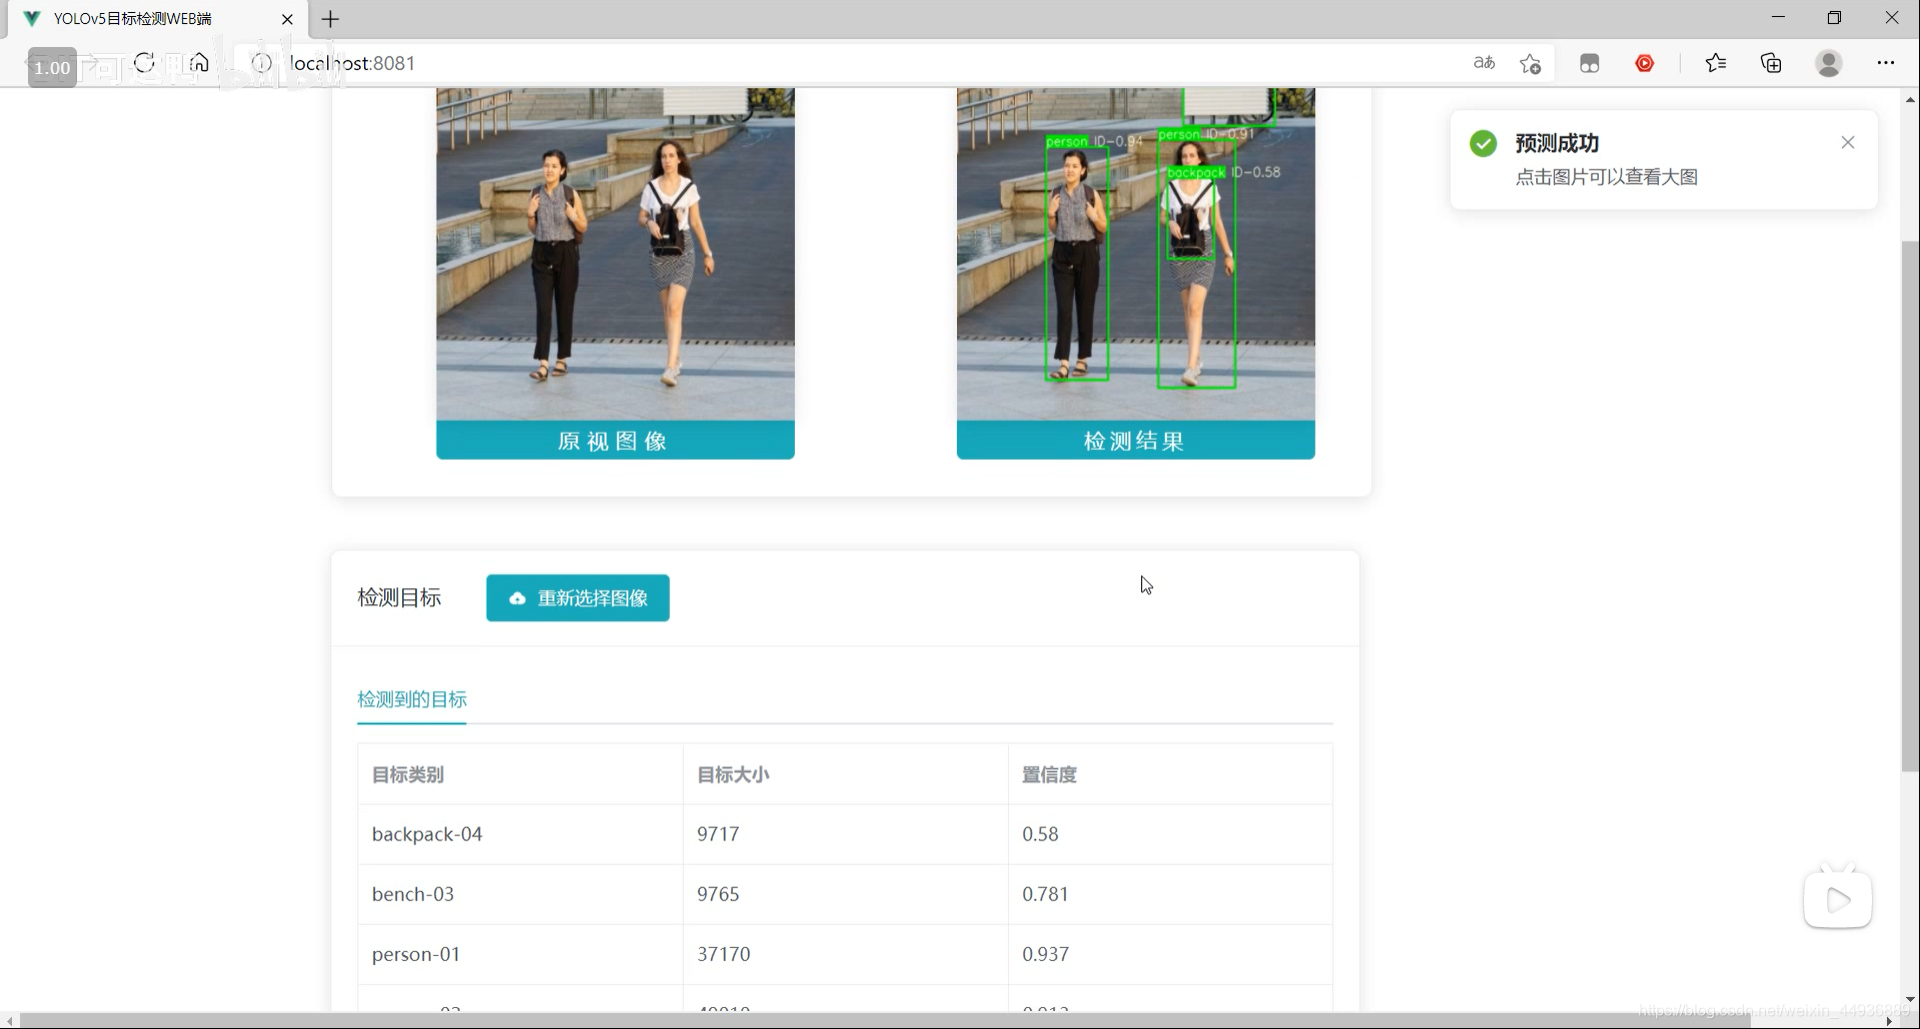
最终效果:

在这里插入图片描述

源码已经上传 Github:

https://github.com/Sharpiless/Yolov5-Flask-VUE

2. YOLOv5模型训练:

训练自己的数据集可以看我这篇博客:

【小白CV】手把手教你用YOLOv5训练自己的数据集(从Windows环境配置到模型部署)

这里演示的话我就用官方训练好的 yolov5m.pt 模型。

3. YOLOv5模型预测:

预测接口:

import torch
import numpy as np
from models.experimental import attempt_load
from utils.general import non_max_suppression, scale_coords, letterbox
from utils.torch_utils import select_device
import cv2
from random import randint


class Detector(object):

    def __init__(self):
        self.img_size = 640
        self.threshold = 0.4
        self.max_frame = 160
        self.init_model()

    def init_model(self):

        self.weights = 'weights/yolov5m.pt'
        self.device = '0' if torch.cuda.is_available() else 'cpu'
        self.device = select_device(self.device)
        model = attempt_load(self.weights, map_location=self.device)
        model.to(self.device).eval()
        model.half()
        # torch.save(model, 'test.pt')
        self.m = model
        self.names = model.module.names if hasattr(
            model, 'module') else model.names
        self.colors = [
            (randint(0, 255), randint(0, 255), randint(0, 255)) for _ in self.names
        ]

    def preprocess(self, img):

        img0 = img.copy()
        img = letterbox(img, new_shape=self.img_size)[0]
        img = img[:, :, ::-1].transpose(2, 0, 1)
        img = np.ascontiguousarray(img)
        img = torch.from_numpy(img).to(self.device)
        img = img.half()  # 半精度
        img /= 255.0  # 图像归一化
        if img.ndimension() == 3:
            img = img.unsqueeze(0)

        return img0, img

    def plot_bboxes(self, image, bboxes, line_thickness=None):
        tl = line_thickness or round(
            0.002 * (image.shape[0] + image.shape[1]) / 2) + 1  # line/font thickness
        for (x1, y1, x2, y2, cls_id, conf) in bboxes:
            color = self.colors[self.names.index(cls_id)]
            c1, c2 = (x1, y1), (x2, y2)
            cv2.rectangle(image, c1, c2, color,
                          thickness=tl, lineType=cv2.LINE_AA)
            tf = max(tl - 1, 1)  # font thickness
            t_size = cv2.getTextSize(
                cls_id, 0, fontScale=tl / 3, thickness=tf)[0]
            c2 = c1[0] + t_size[0], c1[1] - t_size[1] - 3
            cv2.rectangle(image, c1, c2, color, -1, cv2.LINE_AA)  # filled
            cv2.putText(image, '{} ID-{:.2f}'.format(cls_id, conf), (c1[0], c1[1] - 2), 0, tl / 3,
                        [225, 255, 255], thickness=tf, lineType=cv2.LINE_AA)
        return image

    def detect(self, im):

        im0, img = self.preprocess(im)

        pred = self.m(img, augment=False)[0]
        pred = pred.float()
        pred = non_max_suppression(pred, self.threshold, 0.3)

        pred_boxes = []
        image_info = {}
        count = 0
        for det in pred:
            if det is not None and len(det):
                det[:, :4] = scale_coords(
                    img.shape[2:], det[:, :4], im0.shape).round()

                for *x, conf, cls_id in det:
                    lbl = self.names[int(cls_id)]
                    x1, y1 = int(x[0]), int(x[1])
                    x2, y2 = int(x[2]), int(x[3])
                    pred_boxes.append(
                        (x1, y1, x2, y2, lbl, conf))
                    count += 1
                    key = '{}-{:02}'.format(lbl, count)
                    image_info[key] = ['{}×{}'.format(
                        x2-x1, y2-y1), np.round(float(conf), 3)]

        im = self.plot_bboxes(im, pred_boxes)
        return im, image_info

处理完保存到服务器本地临时的目录下:

import os

def pre_process(data_path):
    file_name = os.path.split(data_path)[1].split('.')[0]
    return data_path, file_name
import cv2

def predict(dataset, model, ext):
    global img_y
    x = dataset[0].replace('\\', '/')
    file_name = dataset[1]
    print(x)
    print(file_name)
    x = cv2.imread(x)
    img_y, image_info = model.detect(x)
    cv2.imwrite('./tmp/draw/{}.{}'.format(file_name, ext), img_y)
    return image_info
from core import process, predict


def c_main(path, model, ext):
    image_data = process.pre_process(path)
    image_info = predict.predict(image_data, model, ext)

    return image_data[1] + '.' + ext, image_info


if __name__ == '__main__':
    pass

4. Flask 部署:

然后通过Flask框架写相应函数:

@app.route('/upload', methods=['GET', 'POST'])
def upload_file():
    file = request.files['file']
    print(datetime.datetime.now(), file.filename)
    if file and allowed_file(file.filename):
        src_path = os.path.join(app.config['UPLOAD_FOLDER'], file.filename)
        file.save(src_path)
        shutil.copy(src_path, './tmp/ct')
        image_path = os.path.join('./tmp/ct', file.filename)
        pid, image_info = core.main.c_main(
            image_path, current_app.model, file.filename.rsplit('.', 1)[1])
        return jsonify({'status': 1,
                        'image_url': 'http://127.0.0.1:5003/tmp/ct/' + pid,
                        'draw_url': 'http://127.0.0.1:5003/tmp/draw/' + pid,
                        'image_info': image_info})

    return jsonify({'status': 0})

这样前端发出POST请求时,会对上传的图像进行处理。

5. VUE前端:

主要是通过VUE编写前端WEB框架。

核心前后端交互代码:

	// 上传文件
    update(e) {
      this.percentage = 0;
      this.dialogTableVisible = true;
      this.url_1 = "";
      this.url_2 = "";
      this.srcList = [];
      this.srcList1 = [];
      this.wait_return = "";
      this.wait_upload = "";
      this.feature_list = [];
      this.feat_list = [];
      this.fullscreenLoading = true;
      this.loading = true;
      this.showbutton = false;
      let file = e.target.files[0];
      this.url_1 = this.$options.methods.getObjectURL(file);
      let param = new FormData(); //创建form对象
      param.append("file", file, file.name); //通过append向form对象添加数据
      var timer = setInterval(() => {
        this.myFunc();
      }, 30);
      let config = {
        headers: { "Content-Type": "multipart/form-data" },
      }; //添加请求头
      axios
        .post(this.server_url + "/upload", param, config)
        .then((response) => {
          this.percentage = 100;
          clearInterval(timer);
          this.url_1 = response.data.image_url;
          this.srcList.push(this.url_1);
          this.url_2 = response.data.draw_url;
          this.srcList1.push(this.url_2);
          this.fullscreenLoading = false;
          this.loading = false;

          this.feat_list = Object.keys(response.data.image_info);

          for (var i = 0; i < this.feat_list.length; i++) {
            response.data.image_info[this.feat_list[i]][2] = this.feat_list[i];
            this.feature_list.push(response.data.image_info[this.feat_list[i]]);
          }

          this.feature_list.push(response.data.image_info);
          this.feature_list_1 = this.feature_list[0];
          this.dialogTableVisible = false;
          this.percentage = 0;
          this.notice1();
        });
    },

这段代码在点击提交图片时响应:

		<div slot="header" class="clearfix">
            <span>检测目标span>
            <el-button
              style="margin-left: 35px"
              v-show="!showbutton"
              type="primary"	
              icon="el-icon-upload"
              class="download_bt"
              v-on:click="true_upload2"
            >
              重新选择图像
              <input
                ref="upload2"
                style="display: none"
                name="file"
                type="file"
                @change="update"
              />
            el-button>
          div>

6. 启动项目:

在 Flask 后端项目下启动后端代码:

python app.py

在 VUE 前端项目下,先安装依赖:

npm install

然后运行前端:

npm run serve

然后在浏览器打开localhost即可:

在这里插入图片描述

关注我的公众号:

感兴趣的同学关注我的公众号——可达鸭的深度学习教程:

在这里插入图片描述

Owner
BIT可达鸭
Mixed Transformer UNet for Medical Image Segmentation

MT-UNet Update 2021/11/19 Thank you for your interest in our work. We have uploaded the code of our MTUNet to help peers conduct further research on i

dotman 92 Dec 25, 2022
coldcuts is an R package to automatically generate and plot segmentation drawings in R

coldcuts coldcuts is an R package that allows you to draw and plot automatically segmentations from 3D voxel arrays. The name is inspired by one of It

2 Sep 03, 2022
Code for CVPR2021 paper "Learning Salient Boundary Feature for Anchor-free Temporal Action Localization"

AFSD: Learning Salient Boundary Feature for Anchor-free Temporal Action Localization This is an official implementation in PyTorch of AFSD. Our paper

Tencent YouTu Research 146 Dec 24, 2022
Multi-layer convolutional LSTM with Pytorch

Convolution_LSTM_pytorch Thanks for your attention. I haven't got time to maintain this repo for a long time. I recommend this repo which provides an

Zijie Zhuang 734 Jan 03, 2023
ROSITA: Enhancing Vision-and-Language Semantic Alignments via Cross- and Intra-modal Knowledge Integration

ROSITA News & Updates (24/08/2021) Release the demo to perform fine-grained semantic alignments using the pretrained ROSITA model. (15/08/2021) Releas

Vision and Language Group@ MIL 48 Dec 23, 2022
Training code and evaluation benchmarks for the "Self-Supervised Policy Adaptation during Deployment" paper.

Self-Supervised Policy Adaptation during Deployment PyTorch implementation of PAD and evaluation benchmarks from Self-Supervised Policy Adaptation dur

Nicklas Hansen 101 Nov 01, 2022
A Comprehensive Study on Learning-Based PE Malware Family Classification Methods

A Comprehensive Study on Learning-Based PE Malware Family Classification Methods Datasets Because of copyright issues, both the MalwareBazaar dataset

8 Oct 21, 2022
DLWP: Deep Learning Weather Prediction

DLWP: Deep Learning Weather Prediction DLWP is a Python project containing data-

Kushal Shingote 3 Aug 14, 2022
Implementation of Artificial Neural Network Algorithm

Artificial Neural Network This repository contain implementation of Artificial Neural Network Algorithm in several programming languanges and framewor

Resha Dwika Hefni Al-Fahsi 1 Sep 14, 2022
Anchor Retouching via Model Interaction for Robust Object Detection in Aerial Images

Anchor Retouching via Model Interaction for Robust Object Detection in Aerial Images In this paper, we present an effective Dynamic Enhancement Anchor

13 Dec 09, 2022
Collective Multi-type Entity Alignment Between Knowledge Graphs (WWW'20)

CG-MuAlign A reference implementation for "Collective Multi-type Entity Alignment Between Knowledge Graphs", published in WWW 2020. If you find our pa

Bran Zhu 28 Dec 11, 2022
Real-ESRGAN: Training Real-World Blind Super-Resolution with Pure Synthetic Data

Real-ESRGAN Real-ESRGAN: Training Real-World Blind Super-Resolution with Pure Synthetic Data Ported from https://github.com/xinntao/Real-ESRGAN Depend

Holy Wu 44 Dec 27, 2022
🏃‍♀️ A curated list about human motion capture, analysis and synthesis.

Awesome Human Motion 🏃‍♀️ A curated list about human motion capture, analysis and synthesis. Contents Introduction Human Models Datasets Data Process

Dennis Wittchen 274 Dec 14, 2022
Bottom-up Human Pose Estimation

Introduction This is the official code of Rethinking the Heatmap Regression for Bottom-up Human Pose Estimation. This paper has been accepted to CVPR2

108 Dec 01, 2022
A PyTorch implementation of deep-learning-based registration

DiffuseMorph Implementation A PyTorch implementation of deep-learning-based registration. Requirements OS : Ubuntu / Windows Python 3.6 PyTorch 1.4.0

24 Jan 03, 2023
Tom-the-AI - A compound artificial intelligence software for Linux systems.

Tom the AI (version 0.82) WARNING: This software is not yet ready to use, I'm still setting up the GitHub repository. Should be ready in a few days. T

2 Apr 28, 2022
Running AlphaFold2 (from ColabFold) in Azure Machine Learning

Running AlphaFold2 (from ColabFold) in Azure Machine Learning Colby T. Ford, Ph.D. Companion repository for Medium Post: How to predict many protein s

Colby T. Ford 3 Feb 18, 2022
An Evaluation of Generative Adversarial Networks for Collaborative Filtering.

An Evaluation of Generative Adversarial Networks for Collaborative Filtering. This repository was developed by Fernando B. Pérez Maurera. Fernando is

Fernando Benjamín PÉREZ MAURERA 0 Jan 19, 2022
Official Repository for our ICCV2021 paper: Continual Learning on Noisy Data Streams via Self-Purified Replay

Continual Learning on Noisy Data Streams via Self-Purified Replay This repository contains the official PyTorch implementation for our ICCV2021 paper.

Jinseo Jeong 22 Nov 23, 2022
A vision library for performing sliced inference on large images/small objects

SAHI: Slicing Aided Hyper Inference A vision library for performing sliced inference on large images/small objects Overview Object detection and insta

Open Business Software Solutions 2.3k Jan 04, 2023